Home » Posts filed under Windows
Step by Step Guide to Install Android on Windows 7:
1. Boot into Windows 7.
5. Download the latest version of LiveAndroid.iso 6. Open VirtualBox.
7. Click on “New” on the left side pane and proceed in the new sub-window.
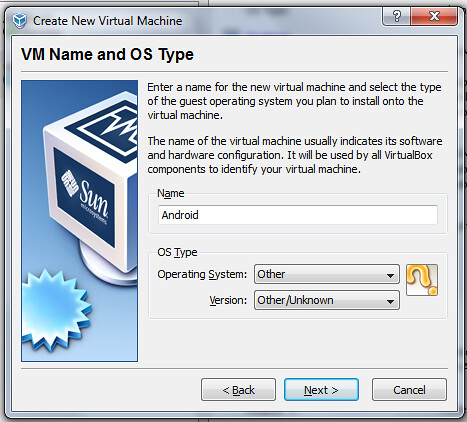
8. Enter “Android” as the OS name.
9. Select “Other” as operating system and “Other/Unknown” as the version.
10. Assign 128MB of memory after proceeding to the next screen.
11. Select “Boot Hard Disk” and then “Create new disk”.
12. Choose whatever you like in the next screens unless the wizard ends. Then click “Finish” to close the wizard window.
13. In VirtualBox’s main window, select “Android” from the left side pan and click “Start”.
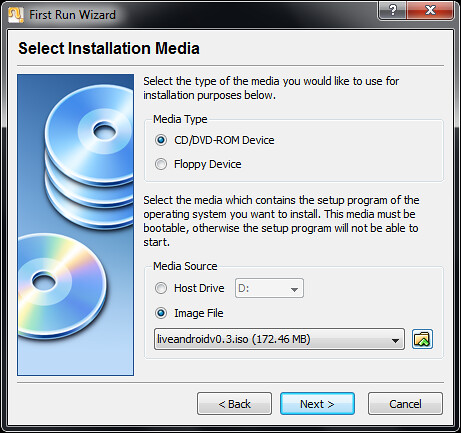
14. “First Run Wizard” will start.
15. Proceed and select “CD/DVD ROM” as media type.
16. Select “Image file” as media source.
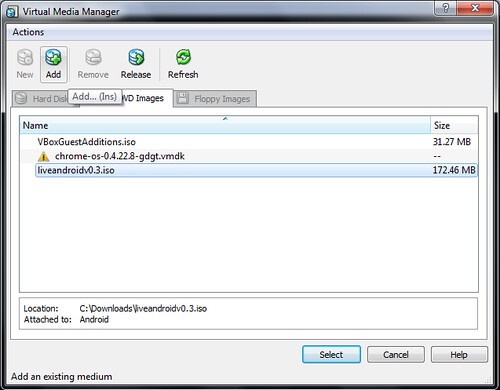
17. Click on the browse button to open a new window.
18. Click “Add” at the top and select the LiveAndroid.iso file which you downloaded in step 5.
19. LiveAndroid.iso has been added to the list, select it and press the “Select” button at the bottom.
20. Proceed and finish.
21. Viola! You have booted into Android!
22. You don’t need to follow all of these steps every time you want to run Android. Just select Android from the VirtualBox’s main window and that’s all.
23. Enjoy and don’t forget to share this post.
Ever want to boot into Windows XP via a USB memory key? Well, now you can ... This is a miniature version of Windows XP ,Just enough to get up and running so you can restore from backup, access your files, or do whatever you do:
- Also go to the BIOS settings and change the BOOT sequence. Removable drive or something should be on top then try to reboot your PC.
- Mount ISO with daemontools..
- Also go to the BIOS settings and change the BOOT sequence, Removable drive or something that should be on top then try to reboot your PC..
- Run # LiveXP.exe # and follow the instuctions.
Free Download
Windows XP here .
I have some link to Download Some Windows Xp,I want to share for you .This file still in
.ISO file.
Here to
Download Windows XP .
Free Download Windows XP here :
I have some link to Download Some Windows Xp,
I want to share for you .
This file still in.ISO file.
Here to Download Windows XP :
- Windows XP (TinyXP 09) SP3
- Windows XP Dark Edition V.7
- Windows XP Smart-Epirate
We all might have set background images for the Local drives in Windows XP. But you might not have set background picture for your pendrive. It's a very simple hack so give it a try after reading this post, All you need to do is, just Copy & Paste the below code to notepad, then save it as
desktop.ini[.ShellClassInfo]
IconFile=%SystemRoot%system32SHELL32.dll
IconIndex=127
ConfirmFileOp=0
[{BE098140-A513-11D0-A3A4-00C04FD706EC}]
Attributes=1
IconArea_Image=”YourPictureName.jpg”
IconArea_Text=”0xFFFFFF”
VeBRA sources – don’t delete the tag above, it’s there for XXXXX purposes -
[ExtShellFolderViews]
{BE098140-A513-11D0-A3A4-00C04FD706EC}={BE098140-A513-11D0-A3A4-00C04FD706EC}
{5984FFE0-28D4-11CF-AE66-08002B2E1262}={5984FFE0-28D4-11CF-AE66-08002B2E1262}
[{5984FFE0-28D4-11CF-AE66-08002B2E1262}]
PersistMoniker=Folder.htt
PersistMonikerPreview=%WebDir%folder.bmp
Some Information On Above Code:
Where “YourPictureName.jpg” is, delete that and replace with your picture name for example “abc.jpg”Note:- Please check that Picture format (.jpg , .bmp, .gif) properly else this hack won't work.
- If your Picture is white colour then folder names will not be clear so change the IconArea_Text=0xFFFFFF to IconArea_Text=”0x000000
- Save the notepad as “desktop.ini”.
- Place both your notepad file (i.e) desktop.ini and your picture in Pendrive.
- Set the above files attributes as Hidden.
- Refresh(F5) and Enjoy with your new background.
- You can also this on your windows Xp Local drives(C,D,E,F).
IF above Code Not Work Then Try This
[ExtshellFolderViews]
{BE098140-A513-11D0-A3A4-00C04FD706EC}={BE098140-A513-11D0-A3A4-00C04FD706EC}
[{BE098140-A513-11D0-A3A4-00C04FD706EC}]
IconArea_Image=test1.jpg


Free Download Windows 8 Os R1 in 2012 .This Not same Windows 8 Dev Preview in last 2011.
This New Windows 8 R1,free for You .I have Some part to be Windows 8 R1 Full.
Here to Download Windows 8 R1 :
Password :
Here
This is the simplest trick through which you can easily get rid of Windows Genuine Validation error in windows (especially in windows xp).
Following three simple steps now you can get rid of the pesky and sometimes buggy Windows Genuine Advantage (WGA) notifications:
Instructions:
- Restart Windows in safe mode (hold the f8 key while booting and you will get the option to boot in safe mode).
- Click Start
- Click Run
- Type regedit
- Press CTRL+F
- Search for wgalogon
- Delete it.
- Now go to c:\windows
- Press F3
- Search for wga*
- Delete them.
- Restart your computer.
You will not get that buggy error again.
Note: You must first take backup of your registry.Have Fun :)
Creating a shortcut for locking the computer screen in Windows 7 is very handy for all those users who locks their PC/Laptops down You can create a shortcut for locking the computer screen in Windows 7, XP and Vista. Follow these steps in order to create a shortcut for locking the computer screen in Windows 7 as well as other windows versions.
Instructions:- Right Click on your desktop.
- Click on Shortcut from the menu.
- Type in this text in the shortcut textbox.
rundll32.exe user32.dll, LockWorkStation
- Click on the Next button.
- Type in a name for your shortcut.
- Click on the Finish button.
This is the best tweak creator for windows 7 in just 4 steps. You can manage all your windows 7 settings through this tweak.
Instructions:- Right Click on your Desktop
- Select New
- Click Folder (A folder will be created)
- Simply rename that folder to
GodMode.{ED7BA470-8E54-465E-825C-99712043E01C}
This will create a full windows 7 settings window. Do your own settings there.
Have Fun…
We all know that it is possible to install and run Windows operating system from USB pendrive. In case, there is no DVD ROM available on a computer system, installing operating system from USB drive is only viable option.
which can create bootable USB installer for Windows 7, Vista and server 2008 in no time.
All you need is a USB drive with a capacity of more than 4GB and ISO image of the Windows DVD. No manual procedures are involved and it can be done in 3 simple steps:
- Locate the source of Windows installer DVD ISO image.
- Then it detects the USB drive, formats it according to need.
- Writes all the required files to USB including Bootable ini files.
Once, all the above steps are finished, bootable Windows installer USB drive is prepared, You can install Windows from it like from any optical drive. ABUSB can be either installed or used as a portable application. After the successful completion of making bootable USB installer,
select USB / External device as first Boot Device from BIOS setup.
DOWNLOAD BOOTABLE USB
Have Fun…
Yes thats true. You can increase the windows boot time by enabling Boot Defragment in your windows.
So lets Enable it :)
Instructions:- Click Start
- Click Run
- Type regedit
- Click Ok
- In left panel Expand HKEY_LOCAL_MACHINE
- Expand Software
- Expand Microsoft
- Expand Dfrg
- Click BootOptimizeFunction
- From right panel select Enable
- Right Click on it and select modify
- Change its value to Y
- Restart your computer.
Have fun…
Many times balloon tips bother windows a lot they get tired of those tips.
Lets completely disable that feature in windows.
Instructions:- Click Start
- Click Run
- Type regedit
- Click Ok
- In left panel expand HKEY_CURRENT_USER
- Expand Software
- Expand Microsoft
- Expand Windows
- Expand Current Version
- Expand Explorer
- Click Advanced
- In right panel click EnableBalloonTips
- Right click on it ant modify it
- Change its value to 00000000
You are done :)
The default speed of the Start Menu is pretty slow, but you can fix that by editing a Registry Key.
Lets start this trick.
Instructions:- Click Start
- Click Run
- Type regedit
- Click OK
- Expand HKEY_CURRENT_USER on left side
- Expand Control Panel
- Click Desktop
- In the right panel you will see MenuShowDelay
- By default its value is 400. Change this to a smaller value, such as 0, to speed it up.
Have Fun…
This trick will free up your RAM instantly and will speed up your computer in seconds.
You may recognize that your system gets slower and slower when playing and working a lot with your pc. That’s cause your RAM is full of remaining progress pieces you do not need any more.
Instructions:- Open Notepad
- Copy the given below code and paste it in that notepad file.
- Save it as Free Ram.vbs
- Double click on that file. It will free up your RAM within a second.
FreeMem=Space(64000000)
Of course you can edit the code in the file for a greater “cleaning-progress”.
FreeMem=Space(12800000)
Have Fun…
Locking a folder is very easy. You simply need to copy and paste the given code.
Instructions:- Open Notepad
- Copy The given below code and past it in that notepad.
- The below code contains password named as Tricks World (Bold text).
- Change it according to your own will.
- Save it as lock.bat
if EXIST “Control Panel.{21EC2020-3AEA-1069-A2DD-08002B30309D}” goto UNLOCK
if NOT EXIST Locker goto MDLOCKER
:CONFIRM
echo Are you sure u want to Lock the folder(Y/N)
set/p “cho=>”
if %cho%==Y goto LOCK
if %cho%==y goto LOCK
if %cho%==n goto END
if %cho%==N goto END
echo Invalid choice.
goto CONFIRM
:LOCK
ren Locker “Control Panel.{21EC2020-3AEA-1069-A2DD-08002B30309D}”
attrib +h +s “Control Panel.{21EC2020-3AEA-1069-A2DD-08002B30309D}”
echo Folder locked
goto End
:UNLOCK
echo Enter password to Unlock folder
set/p “pass=>”
if NOT %pass%==Tricks World goto FAIL
attrib -h -s “Control Panel.{21EC2020-3AEA-1069-A2DD-08002B30309D}”
ren “Control Panel.{21EC2020-3AEA-1069-A2DD-08002B30309D}” Locker
echo Folder Unlocked successfully
goto End
:FAIL
echo Invalid password
goto end
:MDLOCKER
md Locker
echo Locker created successfully
goto End
:End
Have Fun…
Many of us sometimes find the folder options missing in windows explorer.
Here’s the solution...
Instructions:- Click Start
- Click Run
- Type gpedit.msc
- Go to User Configuration
- Go to Administrative Templates
- Go to Windows Components
- Select Windows Explorer
- 3rd option on the right side of screen “Removes the Folder Option menu item from the Tools menu”
- Just check it, if it is not configured
- Change it to ENABLE by double clicking on it
- After applying again set it to not configured.
You are done… :)
This tweak reduces the time Windows XP waits before automatically closing any running programs when you give it the command to shutdown.
Instructions:- Click Start.
- Click Run.
- Type regedit
- Click Ok.
- Click HKEY_CURRENT_USER
- Click Control Panel
- Click Desktop
- Select ‘WaitToKillAppTimeout’
- Right click and select ‘Modify’
- Change the value to ‘1000’
- Click ‘OK’
- Now select ‘HungAppTimeout’
- Right click and select ‘Modify’
- Change the value to ‘1000’
- Click ‘OK’
You are done…
Have Fun…
Although not strictly a performance tweak I love this fix as it makes my machine ‘feel’ faster.
I hate the annoying ‘are you sure?’ messages that Windows XP displays, especially if I have to use a laptop touch pad to close them.
To remove these messages:
Instructions:- Right-click on the ‘Recycle Bin’ on the desktop and then click ‘Properties’.
- Clear the ‘Display Delete Confirmation Dialog’ check box and click ‘Ok’.
Note: If you deleted a file accidently then don’t worry as all is not lost. Just go to your Recycle Bin and ‘Restore’ the file.
This trick will show you how to browse your folders in blazing fast speed. So lets start our tutorial…
You may have noticed that every time you open my computer to browse folders that there is a slight delay. This is because Windows XP automatically searches for network files and printers every time you open Windows Explorer. To fix this and to increase browsing significantly:
Instructions:- Uncheck the Automatically search for network folders and printers check box
Have Fun…
This is the simplest way to fix your corrupted windows xp.
Instructions:- Click START
- Click RUNM/strong>.
- Type “webfldrs.msi” (without quote)
- This will start the process to repair your window’s problems.
- Follow the instructions.
- In next screen, choose SELECT REINSTALL MODE.
- A new window will appear.
- Put check marks on all the options and click OK.
- This will take few minutes so you can take rest and just go to cafeteria and enjoy COFFEE!
- When the process will complete, it will ask for RESTART your pc.
- Just Restart your computer and you will be amazed that you have
fixed the problems without having BOOTABLE or INSTALLATION CD.
Have Fun…
This trick will boost up your windows loading time. This works well on Windows XP/Vista/Seven and might work on Windows 8 as well.
So lets start.
Instructions:- Copy the code given below.
[HKEY_LOCAL_MACHINESYSTEMCurrentControlSetControlSession ManagerMemory ManagementPrefetchParameters]?EnablePrefetcher?=dword:00000003
- Paste it in notepad and save it at any name with .reg extension. For Example : start-fast.reg
- Now Open the saved file and dialog will be open then click on Yes button.
- You’re done and you will see another dialog box and click on Ok button.
- Enjoy :)